User Guide
Hewlett-Packard
Copyright © 2000-2009 Hewlett-Packard Development Company, L.P.
This program is free software; you can redistribute it and/or modify it under the terms of the GNU General Public License as published by the Free Software Foundation; either version 2 of the License, or (at your option) any later version.
This program is distributed in the hope that it will be useful, but WITHOUT ANY WARRANTY; without even the implied warranty of MERCHANTABILITY or FITNESS FOR A PARTICULAR PURPOSE. See the GNU General Public License for more details.
You should have received a copy of the GNU General Public License along with this program; if not, write to the Free Software Foundation, Inc., 51 Franklin St, Fifth Floor, Boston, MA 02110-1301, USA.
$Date: 2009/02/20 14:43:59 $
Table of Contents
One of the benefits of FOSS is the amount of choice afforded to the followers and adopters. As always though, this comes with an associated cost, and in particular during deployment and life cycle management. There are many degrees of freedom when one considers the vast amount of choice in Linux distributions, and their respective versions and supported architectures. The question then becomes can users easily deploy their selection, and further, how can such a deployment be scaled to an organizational scale. One solution to this is the LinuxCOE SystemDesigner ( http://linuxcoe.sf.net )
Released to the FOSS community under the GPL in 2005 by Hewlett-Packard, this package provides a web interface to easily deploy a large number of the popular Linux distributions. Used within that corporation for many years, it caters to simple, one-off deployments but can just as easily store a profile of installation selections for mass deployments. The LinuxCOE SystemDesigner web interface allows users to design or augment the properties for a Linux system installation by exposing the various attributes from the specific Linux distribution installation process, yet gives all of them a common look and feel. In this way, users of all expertise levels are accommodated in its usage model. It ultimately utilizes the Linux distribution's native back-end technology for the actual installation, so as to more easily integrate with any IT staff processes, training, and education.
In all of its modes, LinuxCOE SystemDesigner can deploy systems that are completely stock from the distribution perspective. Additionally though, it can easily be extended to offer any number of value-add modules, delivering bundles of software relevant to a particular task or organization. This can include FOSS, proprietary, or localized customization offerings. It is this lack of assumptions about how one runs their infrastructure that ensures compatibility for the use of LinuxCOE SystemDesigner and the preservation of the value proposition of choice in FOSS.
Table of Contents
The following items are prerequisites to successful usage of the LinuxCOE SystemDesigner:
The system generating the installation configuration has the following attributes:
must have access to a W3C standards compliant web browser which can submit HTML forms (All LinuxCOE SystemDesigner web pages and applications are browser-neutral in this regard)
ensure access to a running instance of LinuxCOE SystemDesigner either over the network or locally installed
can access and write either a floppy (1.44MByte or LS120), a USB pen drive, or a bootable ISO/CD-ROM
The desired target host for the install has the following attributes:
a floppy, bootable USB port, CD-ROM drive, or can be booted from virtual media images
typically has a working a network interface card
enough RAM (refer to the respective Linux distribution for recommendations) to effectively run the desired user interface, whether it be command-line or graphical based, plus a compatible keyboard, mouse, and display
a hard drive capable of holding your operating system selections (again refer to the respective Linux distribution for recommendations)
if you select DHCP networking, a working DHCP service, or if selecting a static hostname, be prepared to provide the relevant subnet mask, name server, gateway and optional proxy server information
access to network software repositories for the selected Linux distribution (or alternatively have the Linux vendor supplied media and required license to use entitlement-based software like RedHat Enterprise Linux, SuSE Enterprise Linux)
Depending on how you design your system, the LinuxCOE SystemDesigner boot disk WILL destroy the contents of some or all of your disk drives. Drives will be repartitioned with prejudice, according to your design. Please be sure you know what you are doing (this process might not be for you if you simply want to try Linux on your Windows(R) system), although installing a heterogeneous/dual-boot system is possible if you know what that means and how to go about repartitioning drives).
It is highly recommended that you back up any data on a target system before attempting to install any Linux distribution (or any operating system for that matter). BIOS/IDE/SCSI interactions can often obfuscate which drives are primary and bootable. Linux, unlike many other operating systems, can be safely installed on non BIOS-primary boot drives, and will not hesitate to do so if instructed accordingly by your design.
Laptop (PCMCIA) installation is supported and is available with LinuxCOE SystemDesigner. For older Linux distribution targets, be sure to "check" PCMCIA support when designing your system. Newer laptops with integrated networking should work just like any other desktop or server.
Table of Contents
The LinuxCOE SystemDesigner technology and process has four basic modes of operation:
First, it generates bootable images that include all the requested preferences. This can be done in a totally ad-hoc fashion for a single system deployment and can reference network-based repositories or even local media. Further, it can reference a design profile of predetermined choices.
This second mode includes the ability to manage these design profiles through simple change management cycles.
The third mode is to retrofit desired value-add module, components, or functions overlaid onto the running system.
Finally, for any system already deployed, a simple replay mechanism exists to regenerate a boot image from the running system, or even to mass produce similar boot images
Each of these modes will be described in further sections.
Okay, you have made it this far, so you understand what you need hardware-wise, and generally understand that you need to use the LinuxCOE SystemDesigner web interface. In order to get you introduced to the common usage model, this section will walk you through the steps necessary to generate a bootable image and then start an installation.
The situation outlined in the following use case serves to illustrate the typical scenario.
Bootimage use case:
Using a LinuxCOE SystemDesigner infrastructure available on the Internet or previously setup for your usage, you want to deploy a single system, perhaps to become a personal testbed for one of the many FOSS projects available.
So, locate a running instance of the LinuxCOE SystemDesigner and point your browser to that page:
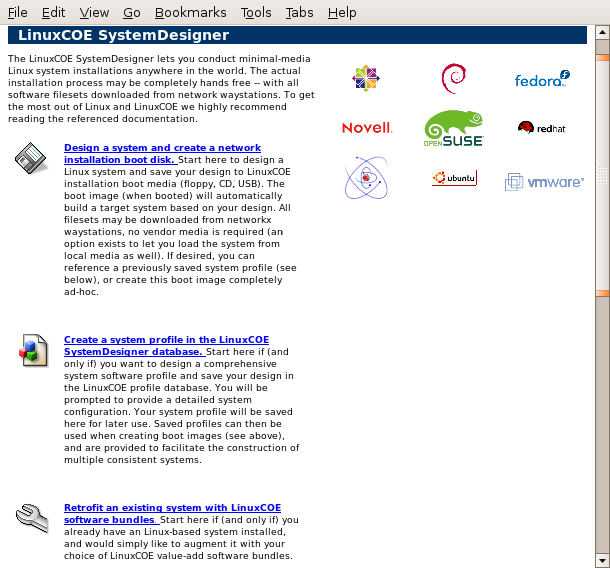
Select the link
Design a system and create a network installation boot image
The first step is to declare your intent regarding network setup parameters and to select the tuple of interest regarding distribution, version, and architecture.
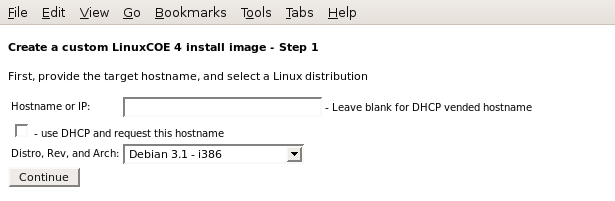
Hostname or IP: Enter the fully qualified hostname or IP address of your target system. If you plan on using DHCP and it will supply the hostname, you may leave the this field blank. If you would like to suggest a hostname to the DHCP (or DDNS) server, you may fill in this field with that information and check the use DHCP and request this hostname checkbox.
Note
If you are expecting to use DHCP, please confirm that your target host will be able to contact DHCP services before proceeding, and that it returns all the necessary networking information (including DNS name server info).
Supported Distributions: Select the desired Linux distribution, version, and architecture tuple for your target system.
Note
If you don't see your desired selection in this list, please contact the administrator of this particular LinuxCOE SystemDesigner instance to see if it can be added.
When satisfied with the settings on this page, press the Continue button.
Note
Depending on the configuration of this particular instance of LinuxCOE SystemDesigner for the tuple you selected, you may be presented with an follow-on form with important licensing or status information. You will have to accept the by clicking on the "I agree" button on that screen to continue the process.
The second step is to begin defining the specifics of what to software to install, and how to reference any repositories.
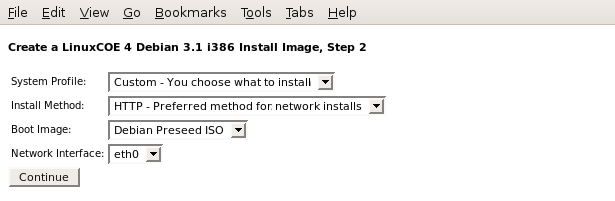
System profile: You may leave this as "Custom - You choose what to install" if you want to build a single system and not use any existing system profiles (setting up profiles will be covered in a subsequent section). You will be prompted for all the relevant software selection information.
Install Method: Depending on your distribution of Linux, you may have several installation protocol options (HTTP/FTP/CDROM). Select whichever is enabled and appropriate to your local situation.
Note
If you don't see your desired selection in this list, please contact the administrator of this particular LinuxCOE SystemDesigner instance to see if it can be added.
Subnet mask, Name server, Gateway: ( these fields will only be visible if you are not using DHCP from the previous screen ) Please modify these fields as appropriate. If you don't know your gateway IP address, you can use your system's IP address as the default gateway (most modern routers can deal with this).
Note
NOTE: If you are unsure of these values, contact your local system administrator or network knowledgeable contact.
Network Interface: If you have a single network card in your target system, it's best to leave this selection as eth0. If you have multiple network cards, please select the appropriate one for this particular installation.
Note
If you don't see your desired selection in this list, please contact the administrator of this particular LinuxCOE SystemDesigner instance to see if it can be added.
When satisfied with the settings on this page, press the Continue button.
The third step is to pick a network repository location, and some language and user input device localizations.
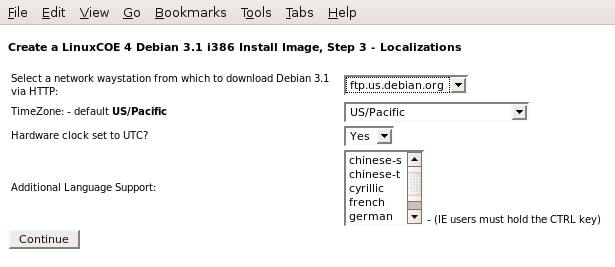
Select a network closest waystation: If a network protocol was selected to access the Linux distribution, pick a server which is nearest "network-wise" to your target system. Please keep in mind that geographic distance is not always consistent with network distance. This is a required field for network installations.
Note
If you don't see your desired selection in this list, please contact the administrator of this particular LinuxCOE SystemDesigner instance to see if it can be added.
TimeZone, Hardware Clock, Language, Keyboard, Mouse: These are all required fields - please enter as appropriate, or take defaults if unsure.
If you had selected a profile, you may see an option Let me override disk/misc configuration in this profile. If you toggle this to "Yes", you will be allowed to adjust disk partitioning and some miscellaneous configurations from your profile.
When satisfied with the settings on this page, press the Continue button.
The fourth step allows you to pick and choose which software bundles or tasks are available to install. Optionally, some value-add modules may also be visible for selection, based on the tuple you have selected, and the configuration of this instance of the LinuxCOE SystemDesigner.
This section applies if and only if you selected "Custom - you choose what to install" as your LinuxCOE system profile. If you selected an existing system profile from the LinuxCOE SystemDesigner database, the web server will skip the next two sections, and take you directly to the last step.
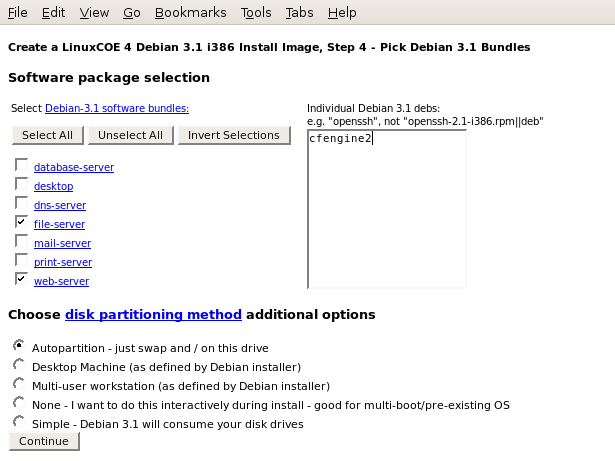
Software Package Selection: Select the desired checkboxes for the prepackaged bundles (collections of packages made available by the Linux distribution), along with any with listing any specific or individual packages in the text box on the right (you can also remove specific packages by prefacing the name with a "-".
Note
All of the package names typed into the text box must reside on the original Linux distribution core media or network repository. Don't try to reference any locally made packages here (although creating a LinuxCOE SystemDesigner profile will allow you to reference such items in the Final Script section, or via a value-add module which would need to be configured by the administrator of this particular LinuxCOE SystemDesigner instance.
For some older distributions or hardware that is not correctly discovered, if you specify support for X11 (XFree86 or Xorg) either directly or indirectly (by selecting an X11-dependent bundle), the installation process may not be hands free by default. The installer will need to make last minute decisions based on your graphics hardware, and you will be prompted to provide this type of information.
Select software Bundles: Select the desired checkboxes for the collections of packages made visible from this instance of LinuxCOE SystemDesigner.
Note
If you don't see your desired selection in this list, please contact the administrator of this particular LinuxCOE SystemDesigner instance to see if it can be added.
Select Patching Options: Select whether to install all available patches during the initial installation and the frequency and method to apply any future patches. In general there may be one or more methods available as selections.
Note
If you don't see your desired selection in this list, please contact the administrator of this particular LinuxCOE SystemDesigner instance to see if it can be added.
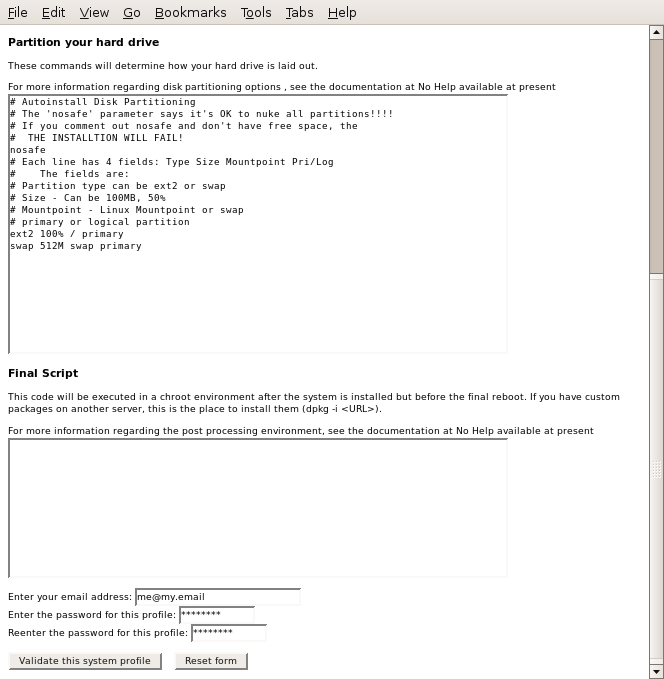
Choose disk partitioning method: Select one of the available options such as None, Autopartition, Simple or Advanced. Selecting None (when available) will pause during the installation and allow you to interactively partition the disk. Selecting Autopartition (when available) will use the installer's built-in default settings to partition the disk. Selecting Simple will prompt you for a simple single-disk system layout. For advanced/complicated installations, select Advanced where you'll be asked to provide all details related to partitions, drives, mount points, boot records and filesystems. Templates regarding Advanced options may also be found in following sub-step or in the Appendix.
When satisfied with the settings on this page, press the Continue button.
At this point, you may be presented with a list of devices to target as the installation disk. Select the appropriate device, and then follow either the "Simple" or "Advanced" disk layout instructions (as dictated by the selection on the previous web page from).
Note
TARGETED DRIVES WILL BE REPARTITIONED AND REFORMATTED (BY DEFAULT)! EXISTING DATA WILL BE LOST!! (please read this out loud one or more times).
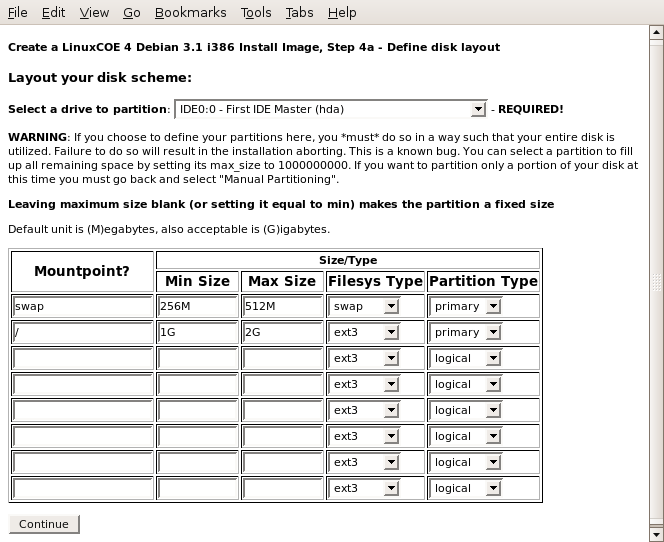
Select disk to partition/consume: For some Linux distributions you must specify the desired target disk and interface. Select an appropriate value for your target system.
Note
If you don't see your desired selection in this list, please contact the administrator of this particular LinuxCOE SystemDesigner instance to see if it can be added.
Simple disk layout: If you selected Simple disk layout, you should now see a table with three filesystems listed. You may add additional filesystems (by example), or modify default sizes here. The Grow option, if available tells the installer to consume all available capacity on the targeted disk, after the fixed-size partitions are created. If you select more than one file system to Grow, then the sizes will interpreted as proportions and grow accordingly.
If you chose this Simple disk layout, skip the next section on Advanced disk layouts.
Advanced disk layout: If you are familiar with the the particular Linux distribution native installation tool (eg. Debian preseed, RedHat Kickstart, SuSE AutoYaST) configuration syntax, this section should be self explanatory (and the supplied examples should help you formulate a viable disk setup).
When satisfied with the settings on this page, press the Continue button.
In this final step, you should now see an overview of your installation configuration decisions, and be prompted for the final parameters.
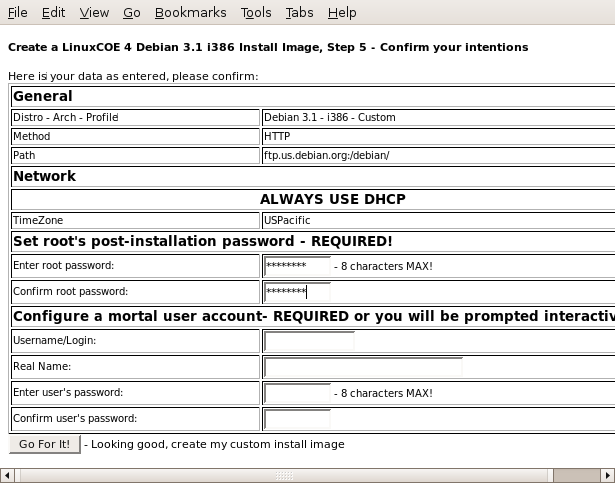
Enter root password: Enter a temporary root password up to 8 characters in length.
Confirm root password: Re-enter the root password as above. As you might expect, this is for your first time login and should likely be changed after your target system is installed as most of the underlying installation mechanisms store this in clear text in the install image.
The remaining fields may be optional and or not appear depending upon the Linux distribution selected.
Configure a mortal user account: Enter the values for a login, real name and password (twice). For some distributions which rely on the sudo paradigm, you may only be prompted for a mortal user to setup instead of the root user setup.
Enable VNC access: For those Linux distributions that offer VNC access during the installation process, enter a password (twice).
When satisfied with the settings on this page, press the Go For It! button to generate a boot image.
Barring any errors, you should now see a hyperlink to your image file, an optional MD5sum of the image, and a reference copy of any associated installation configuration files (data used to build the system per your design). Some older distributions may require the use of multiple floppies (if you selected that image type).
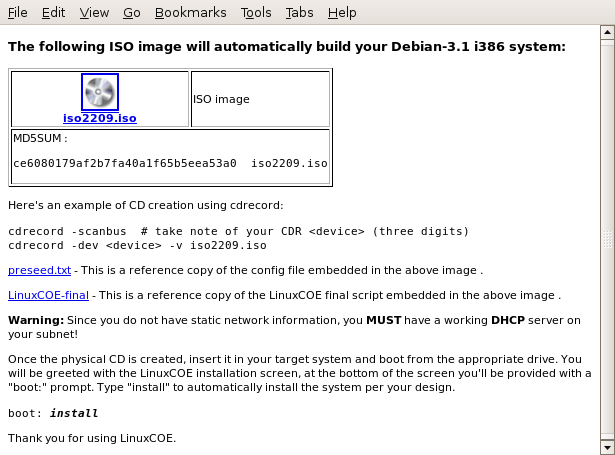
If you are using a linux host to create media with your bootable image, you should follow the instructions on this download page to transfer that image to bootable media formats. If not, the following information may be helpful for a windows user to make viable linux boot image media:
Note
You cannot simply copy the file to a formatted disk, you must use one of the sector/block copy methods outlined below.
For a floppy image, from a PC running a Microsoft(R) operating system, download a raw write utility and run this to create the boot floppy. You MUST use a short (8.3) filename version of the image file.
From a DOS command line or with Microsoft(R) Windows(TM) using "Start / Run", execute
rawrite.exe
You will be prompted for
the location of the source floppy image file (boot.img) (wherever you downloaded the image),
the destination floppy drive letter (a:), and
reminded to insert a blank, formatted diskette.
For a CD image, from a PC running a Microsoft(R) operating system, there are several popular Windows(TM) programs which can burn the provided ISO image to a CD. Note that an ISO is a disk image, and should not be burned to the disc as a normal file.
Details for Roxio's "Easy CD Creator" follow:
If necessary, rename your downloaded image file to include an ".iso" extension.
Launch Easy Cd Creator
Choose File -> Record CD from CD Image
On the CD creation Setup window, click the Advanced Button, then choose Disk at Once. If you use Track at once, you'll get an unusable CD.
From the file selection window, browse for the file. Make sure you chose .ISO image instead of the default .CIF image.
Burn the CD
Details for "Nero Burning ROM" follow:
Start Nero
Choose the menu command "File"->"Burn Image"
An "Open" file dialog box appears with the following image types supported (*.nrg, *.iso, *.cue)
Select your ISO file and click Open
The "Write CD" dialog box appears with several tabs (Info, Foreign image, Misc, Burn).
Click the 'Burn' Tab
Confirm that 'Write' and 'Finalize' are selected
Click on "Write".
Place your newly created floppy (or CD) into your target host and boot from the appropriate drive (or virtual media, if supported).
At this "boot:" prompt type "install" (IA64 users should boot the EFI shell, and type fs0:, followed by elilo install). This will set into motion the installation process.
If all goes well (and you didn't select installation from local media, for which you would be prompted), you should be able to sit back, enjoy, and watch your system install itself. Depending on the size of your system and network bandwidth, the installation process could take from a couple of minutes to several hours to complete. Eventually, you may be presented with a "Congratulations" or similar screen on the target host, prompting you to press OK to reboot the system. Press the Enter key to reboot, and remove any media you may have utilized for the installation from the system.
Now that you have a sense of how the LinuxCOE SystemDesigner is typically used, you realize that you may wish to create standard installation processes for other users to leverage. And you certainly don't want to have to convey all the software selections to them manually, yet they may have some different network or other localizations to be accommodated. This is precisely why the LinuxCOE SystemDesigner profile management interface exists.
The situation outlined in the following use case serves to illustrate the typical scenario.
Profiles use case:
A Linux system manager in Grenoble must deploy a new system in Geneva. Instead of working with Geneva operators (which presumably have little or no Linux installation experience yet), the system manager uses the LinuxCOE SystemDesigner web interface to create a system profile, where he or she defines which software should be installed, along with system localizations like passwords, IP addresses, and timezones. The LinuxCOE SystemDesigner creates a boot image which the Grenoble system manager downloads and makes available to the Geneva operators. The operators dump the image to physical media (or use virtual media access), insert the media in the target system and hit the power switch. The system boots off the custom image and automatically installs itself according to the profile defined by the remote system manager.
Locate a running instance of the LinuxCOE SystemDesigner and point your browser to that page:
Select the link
Create a system profile in the LinuxCOE SystemDesigner database
In the profile management interface of the LinuxCOE SystemDesigner, one can
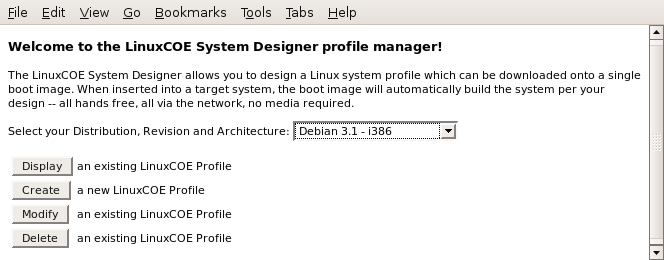
Display or simply view available profiles for a given distribution, version, architecture that anyone has generated
Create and become the owner of a new design profile to be saved in the database for later use
Modify any previously saved design profiles that you own
Delete any previously saved design profiles that you own
Note
For any action that modifies the profile design database, you will be prompted for the owner's authorization credentials, which currently consist of the email address and password associated with that respective profile.
As usual, you must first select the desired Distribution, Version and Architecture from the available list.
Note
If you don't see your desired selection in this list, please contact the administrator of this particular LinuxCOE SystemDesigner instance to see if it can be added.
When ready to display a profile, press the Display button.
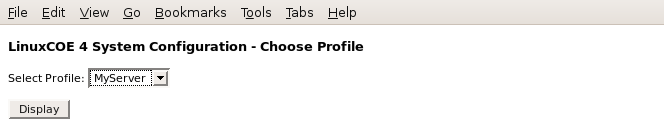
Select Profile: Select the desired profile to view. If there are none listed (feel free to create your own profile, as outlined in the next section), or if your expected selection is not listed, please ensure you selected the correct Distribution, Version, and Architecture on the previous web page.
When satisfied with the settings on this page, press the Display button.
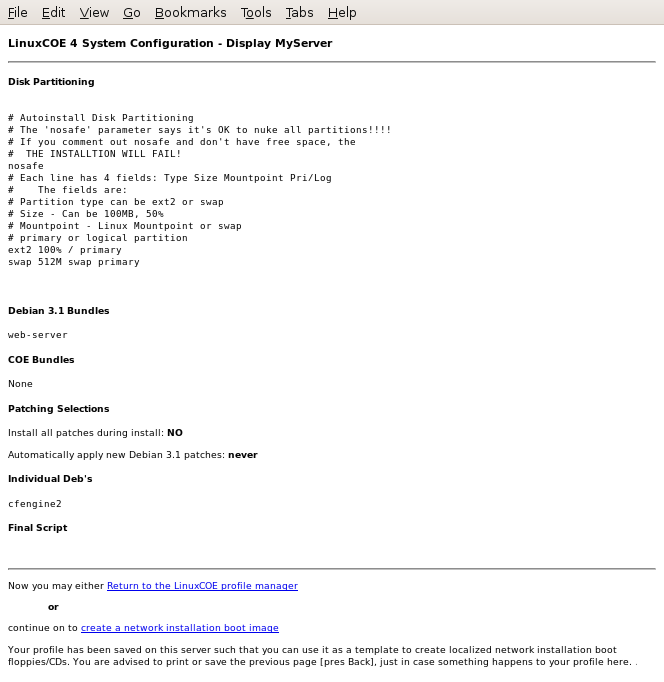
You will be presented with the parameters associated with this design profile for:
Disk Partitioning which shows the syntax configured for disk drive partitioning
Distribution Bundles which shows the specific bundles selected from the core Linux distribution are to be installed
Value-add Bundles which lists which bundles from which value-add modules are to be applied
Note
If you don't see your desired selection in this list, please contact the administrator of this particular LinuxCOE SystemDesigner instance to see if it can be added.
Patching Selections which lists which patch methodology and frequency are configured
Individual Packages which lists any specific packages to add or remove
Final Script which details any post-install actions are to be carried out
When ready to create a profile, press the Create button.
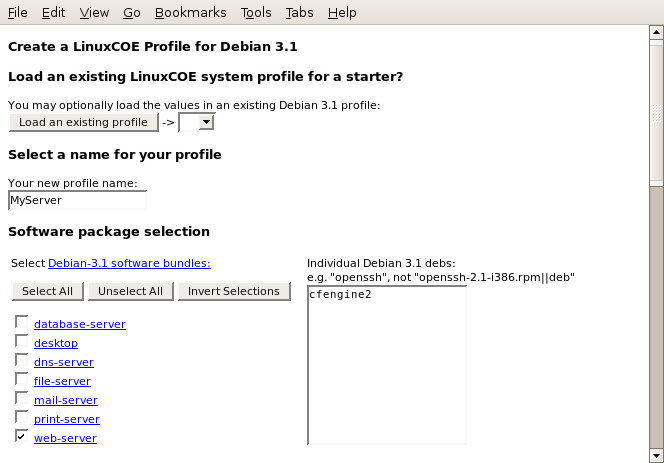
Creating a profile involves defining the software to install, a disk partitioning scheme, an optional patching method and frequency, and any post installation script or actions to take.
In this web interface, you will only be asked those types of questions pertaining to system installation parameters that are likely consistent across multiple systems. As such, this is very similar to the Software package selection portion of the Design a system and create a network installation boot image. Only those sections that differ will be detailed here.
Load an existing LinuxCOE Profile for a starter? If applicable, you may leverage a similar profile to fill out the majority of the requested information. If there isn't such a profile to leverage, you may skip this field. This is basically a copy of the profile selected.
Select a name for your profile: You must enter a unique name for the profile.
The Software package selections, Select software Bundles, and Select Patching Options sections are all similar to their respective section in the Software package selection step of the Design a system and create a network installation boot image process.
The Partition your hard drive: is similar to its corresponding section of the Software package selection section, but utilizes the Advance disk layout methodology and syntax.
Note
A useful hint is to utilize the Design a system and create a network installation boot image process and modify the Simple disk layout until it is similar to what you need. Then on the final download page, review what is in the reference copy of the respective configuration file to get a feel for the parameters and syntax that is available. Use a simple cut and paste to put that information into this section, and modify as needed. Other options are to review the references cited for each particular distribution's installation backend.
Final Script: is where you can specify any post-install actions (subject to the restrictions noted). Here you can modify particular files, add packages from other repositories, or perform some localizations. Be as creative as you like.
Finally, secure your profile with an email address and a password. The address is used to notify you whenever changes occur to your profile. The password will be required to modify or delete this profile and must be entered twice.
When satisfied with the settings on this page, press "Validate this system profile" and you will be presented with a summary page of your profile configuration.
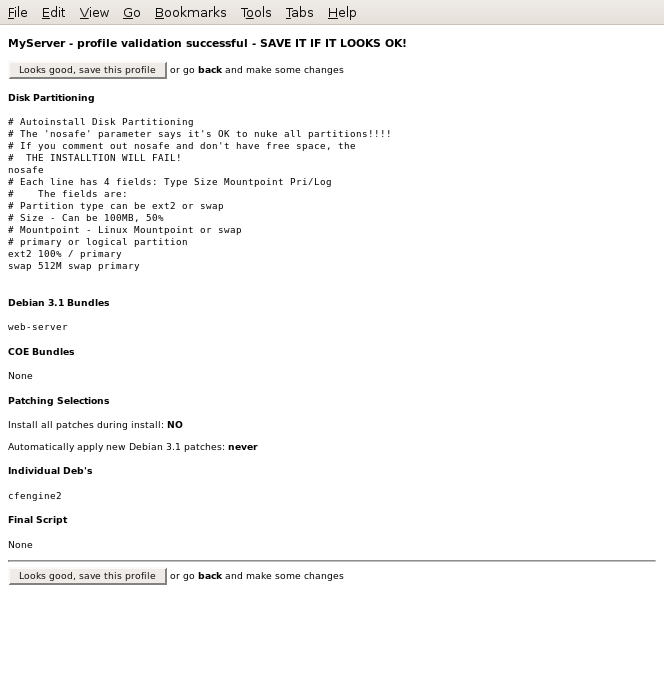
Review your settings. If they need adjustment, you can simply use the browser "Back" functionality to return to the previous page. Otherwise, you can save this profile in the LinuxCOE SystemDesigner database by pressing "Looks good, save this profile".
The Modify action behaves exactly as the Create with the small exception that your existing configuration is pre-loaded into the web interface. Other than that, you can add, modify, or delete items in the various sections as needed.
When ready to delete a profile, press the Delete button.
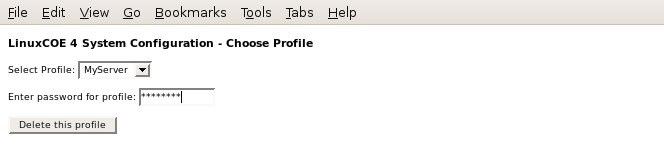
Select Profile: Select the desired profile to delete. If your expected selection is not listed, please ensure you selected the correct Distribution, Version, and Architecture on the previous web page.
Enter password for profile: Enter the password associated with this particular profile.
When satisfied with the settings on this page, press the Delete this profile button.
Note
Be FOREWARNED, a deleted profile can only be recovered from your own recover/restore utilities. Likewise, the association to the email address and the profile's password is also removed, and can only be restored from backup media

The specified profile has been deleted and you can now choose another LinuxCOE SystemDesigner activity.
So, let's say you have some existing Linux systems that were installed by some means (either by the usage of the LinuxCOE SystemDesigner or not). However, you have a need to apply some of the value-add bundles available from a particular LinuxCOE SystemDesigner instance. This can easily be accomplish via the Retrofit mode.
The situation outlined in the following use case serves to illustrate the typical scenario.
Retrofit use case:
A friend or co-worker has either a similar or different Linux distribution would like to leverage some of the same software that you use, perhaps even some that you provide packages for. Using an instance of the LinuxCOE SystemDesigner that is properly configured, you can point them to the retrofit option to obtain and install the software.
Locate a running instance of the LinuxCOE SystemDesigner that contains the desired value-add bundles and point your browser to that page:
Select the link
Retrofit an existing system with LinuxCOE software bundles
In the retrofit interface of the LinuxCOE SystemDesigner, one can pick and choose value-add bundles to overlay onto a running system. Simply select the desired Distribution, Version, and Architecture from the available list.
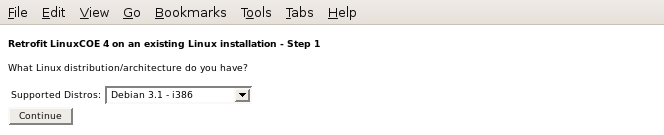
When satisfied with the settings on this page, press the "Continue"
At this point you will be presented with a set of value-add bundles that are available and configured.
Note
If you don't see your desired selection in this list, please contact the administrator of this particular LinuxCOE SystemDesigner instance to see if it can be added.
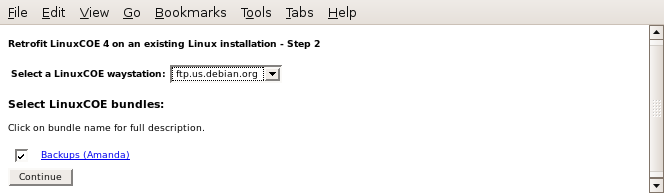
When satisfied with the settings on this page, press the "Continue"
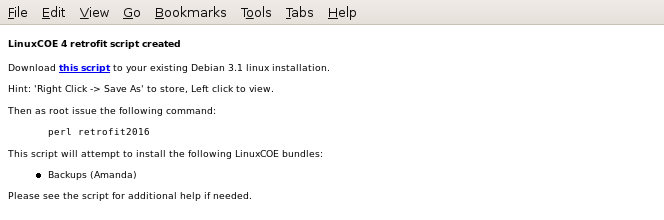
Barring any errors, you should now see a hyperlink to your simple script. Follow the instructions on that page, to download the script. You must then transport this script to the desired target system, and then run it per the instructions. Upon successful completion of the script's execution, your target system will have the desired value add bundles installed (assuming the value-add module was configured correctly).
So, let's say you have an existing Linux system that was installed by the LinuxCOE SystemDesigner. However, you no longer have the original bootimage media nor file, but would really like to recreate that for archival purposes. This can easily be accomplish via the Replay mode.
The situation outlined in the following use case serves to illustrate the typical scenario.
Replay use case:
A friend or co-worker has deployed a Linux system, whose base install was done via the LinuxCOE SystemDesigner. Using the reference node and the same instance of the LinuxCOE SystemDesigner. you can easily re-create the boot image.
You will need access to the reference node and access to the running instance of the LinuxCOE SystemDesigner originally used.
From the reference node, obtain a copy of the following file
/etc/opt/LinuxCOE/replay
Essentially, the replay file is the output of perl's CGI.pm module's 'save' function at the time the boot image was originally created.
To re-generate the bootimage used for the reference node, you would locate the running instance of the LinuxCOE SystemDesigner and point your browser to it:
Select the link
Design a system and create a network installation boot image
You will need to manually append:
?action=replay
to the URL displayed in your browser. If a configuration overlay was used, you may also append it the resulting URL as:
?action=replay&defs=ConfOverlay
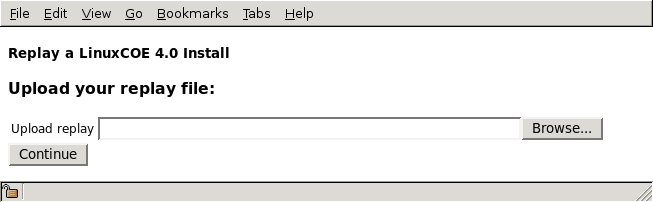
Then either use the Browse button to locate or just manually enter the complete path to the replay filename you obtained from the reference node. When satisfied with the settings on this page, press the Continue button.
The remainder of the process then follows the last steps of the Boot Image process, specifically the Root password and the Download network installation boot image portions.
Of course, the creative types can already start to see the possibilities of how to mass create boot images that only differ in specific attributes. Using the reference node's replay file, you can put in @wildcard@ tokens, and then with something like the following pseudo-code:
        foreach my hostname,ip,gateway from some file or process {
          cat template | sed -e 's/@HOSTNAME@/$hostname/' >$hostname  # useless use of cat :)
          sed -i -e 's/@IP@/$ip/' $hostname			      # useless re-invocation of sed!
          sed -i -e 's/@G8WAY@/$gateway/' $hostname
          ISO=`./replay.pl $hostname 2>>/tmp/replay.log`
          mv $ISO $hostname.iso
        }
Next, if you wanted to fully automate the creation of boot images from the above files, you would need to insert the relevant passwords:
        # Existing replay file snipped
        Root_Pass=T0ps3kr3t
        # If you have mortal user info in your replay file, add password
        User_Pass=luser_pass
        # If AutoYaST, and you wanted VNC during install, same there
        VNC_Pass=lik2wtch
Delivered with the LinuxCOE SystemDesigner service, there is a replay.pl script. If you have access to this server, you can use each of these new replay files to generate the boot images via a command line:
@prefix@/bin/replay.pl replayfile [ defs ]
One thing returns on standard output from the calling script if all goes well, and that's the image name. Any catastrophic errors will propagate back to command line interface and will be prefaced with ERR: and result in a non-zero exit code from the script.
As a user, you should now have a feeling for the vast range of choices afforded by the LinuxCOE SystemDesigner. Depending on how the particular instance you are using is setup, you may have access to many degrees of freedom when it comes to installing your Linux system. In many cases, sensible defaults may have been selected for you, allowing you to basically click your way through the interface and on through the installation. From this simple web interface that provides a common look across differing Linux distributions, versions, and architectures, you can effortlessly setup and install Linux systems. Whether it be one system or many systems, your typical use cases should be satisfied.
The authors collectively are, or have been, employed at Hewlett-Packard company for nearly 60 years of total experience. Each of them has been actively using Linux for the better part of ten years, and helped foster significant Linux adoption within Hewlett-Packard due in large part to their collective contribution to LinuxCOE SystemDesigner. They function and excel as part of a thriving FOSS group nurtured within Hewlett-Packard, and actively promote and leverage contributions from the overall community at large.
The look of the documentation is entirely credited to the foresight of the authors of DocBook and the surrounding ecosystem of tools from that community.
Ever since inception, the LinuxCOE SystemDesigner. has used penguin species as it's mascot, starting with the genus name of Spheniscus, and working it's way through the list in alphabetical order for each major release. Currently the mascot is the Emperor Penguin which we encourage you to look up and learn about in Wikipedia, or some other on-line resource.